


8.
Configuring IDE Options
This chapter discusses the options available in the CodeWarrior IDE Preferences window. In addition, this chapter discusses IDE window toolbars and their configuration.
You can customize CodeWarrior's features through the IDE Preferences window. These global preference settings affect the way the IDE works in all projects.
To view the IDE Preferences window, choose the
The IDE's toolbars are another powerful and flexible feature. You can fully customize the toolbars to fit your own working style and improve your efficiency.
The topics in this chapter include:
Preferences Guided Tour

To open the IDE Preferences window, choose the
The topics in this section are:
Preference Panels

The IDE Preferences window is divided into two parts. The left side of the window has a hierarchical list of available panels. The right side of the window displays the information from a selected panel. The preference panels available to you vary, depending on the CodeWarrior product you are using.
The preference panels affect the IDE as a whole and apply to all projects. To display a particular panel, select its name in the list. You can use the arrow keys or click the name of the panel. Figure 8.1 shows a selected panel in the IDE Preferences window.
Each panel consists of a series of related options that you can modify. After changing these options, you can save them, discard them, restore them, or reset them. See "Dialog Box Buttons" for more information.
Figure 8.1 Selecting a preference panel

Dialog Box Buttons

There are several dialog box buttons in the IDE Preferences window that control how a panel's settings are used and applied.
The topics in this section are:
Discarding changes
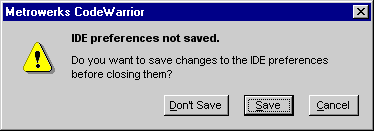
If you change the settings in the IDE Preferences window and then try to close the window, the CodeWarrior IDE displays the dialog box shown in Figure 8.2. To discard your changes, click Don't Save. To keep your changes, click the Save button. To discard your changes and return to the IDE Preferences window so that you can continue making changes, click Cancel.
Figure 8.2 Preferences Confirmation Dialog Box
Factory Settings button
The Factory Settings button causes the panel to revert to the settings that the CodeWarrior IDE uses as defaults. Settings in other panels are not affected by this button. Only the settings for the current panel are reset.
Revert Panel button
The Revert Panel button lets you undo changes in a preference panel. Clicking this button causes the currently selected preference panel to reset to its last saved state. This is useful when you decide against the changes you made.
Save button
The Save button commits all of the current settings in the panels. After closing the IDE Preferences window, the CodeWarrior IDE behaves according to the preferences that you saved.
Choosing Preferences

This section discusses setting preferences for the IDE as a whole. You can learn to configure preferences that affect the debugger, editor, and IDE in general.
To learn how to display a particular preference panel, see "Preferences Guided Tour" on page 249.
In this section, we discuss the features of the IDE that are controlled by each preference panel. The panels are grouped into the following categories:
General Preferences

This section describes the preference panels that control general IDE features. These panels include:
Build Settings
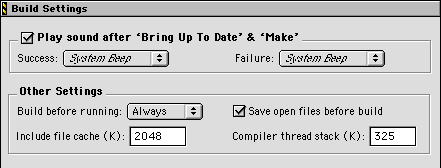
The Build Settings panel, shown in Figure 8.3 (Windows) and Figure 8.4 (Mac OS), provides project build customizations.
To learn how to open the IDE Preferences window and select the Build Settings panel, see "Preferences Guided Tour" on page 249.
Build before running
This pop-up menu determines how the CodeWarrior IDE handles project builds. You can choose to Always build projects before running them, Never build projects before running them, or let the CodeWarrior IDE Ask you how to proceed.
Figure 8.3 Build Settings preference panel (Windows)

Save open files before build
Enable this checkbox if you want to save all open files automatically before a Preprocess, Precompile, Compile, Disassemble, Bring Up To Date, Make, or Run command is executed.
Compiler thread stack
Use the Compiler thread stack field, shown in Figure 8.3 (Windows) and Figure 8.4 (Mac OS), to specify the upper limit of stack size allocated by the IDE for compiling and linking thread support.
All builds in CodeWarrior are threaded, with compilation and linking occurring on a thread separate from the main application thread. This setting lets you control the size of the stack allocated for the compiler thread.
Normally, you should not change this setting. However, if you have a large or very complex project, you can increase this setting to avoid compiler crashes.
Include file cache (Mac OS)
This checkbox, shown in Figure 8.4, specifies the upper limit on how much memory the IDE should use for caching #include files and precompiled headers. If your computer has a lot of memory and you want to use that memory to speed up builds, increase the number in this field.
Play sound after `Bring Up To Date' & `Make' (Mac OS)
Enable this checkbox, shown in Figure 8.4, to play a sound after finishing a build of your project. You can select different sounds for both successful and unsuccessful build results by using the Success and Failure pop-up menus, respectively.
Figure 8.4 Build Settings preference panel (Mac OS)
IDE Extras
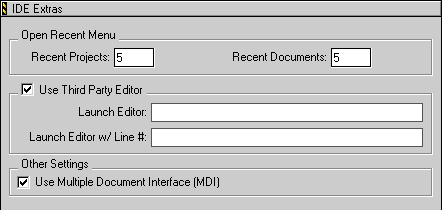
The IDE Extras panel, shown in Figure 8.5 (Windows) and Figure 8.6 (Mac OS), has options to remember previously opened projects and text files and to configure the IDE for use with third-party editors.
To learn how to open the IDE Preferences window and select the IDE Extras panel, see "Preferences Guided Tour" on page 249.
Mac OS
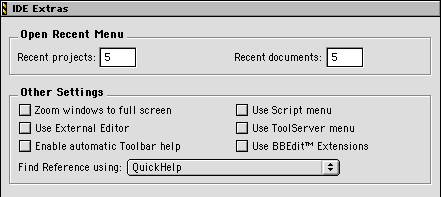
The IDE Extras preference panel also lets you configure miscellaneous options, such as window zooming, the Script menu, automatic help, and online reference databases.
Figure 8.5 IDE Extras preference panel (Windows)
Recent Projects
Enter in this field the maximum number of recent projects that you want displayed in the Open Recent command of the File Menu.
Recent Documents
Type in this field the maximum number of documents that you want displayed in the Open Recent command of the File Menu.
Use Third Party Editor (Windows)
Use this checkbox to control whether the CodeWarrior text editor is used to display text files. When the checkbox is not enabled, the CodeWarrior editor is the default editor for your text files. When this checkbox is enabled, the IDE uses the third-party text editor you specify in the Launch Editor field to display text files.
There are two command lines used for invoking a third-party editor. The first, Launch Editor, specifies the text editor that the IDE uses to display text files. The second command line, Launch Editor w/ Line #, specifies a text editor and an initial line of text to jump to upon launch. For example, the IDE invokes this second command line when you double-click an error message to display the line in a text file that caused the error message.
You can use two variables in the command-line string: %file and %line. When the IDE encounters these variables, it expands %file into the full file path and %line into the initial line number in the file. For example, if you want to use the Emacs text editor to edit text files, then you would type the following command line in the Launch Editor field:
runemacs %file
If you also want the text editor to jump to a particular line in the text file, you would type the following command line in the Launch Editor w/ Line # field:
runemacs +%line %file
For more information about using command lines with a particular text editor, consult the documentation for that editor.
Use Multiple Document Interface (Windows)
Use this checkbox to set the Windows interface style used by the CodeWarrior IDE. Enable the checkbox to use MDI (Multiple Document Interface), or disable the checkbox to use FDI (Floating Document Interface).
Figure 8.6 IDE Extras preference panel (Mac OS)
Zoom windows to full screen (Mac OS, Solaris, and Linux)
This checkbox configures the behavior of the zoom box in the upper right-hand corner of all editor windows. If this checkbox is enabled and you click the zoom box of an editor window, the window resizes to fill the entire screen. If this checkbox is not enabled, clicking the zoom box of an editor window resizes that window to a standard size.
Use External Editor (Mac OS, Solaris, and Linux)
If this checkbox is enabled, the CodeWarrior IDE sends Open Document ('odoc') AppleEvents to AppleScript-compatible third-party text editors. To use this feature, create a (Helper Apps) folder (if it does not already exist) in the CodeWarrior IDE application folder. Next, place an alias inside the (Helper Apps) folder which points to your third-party editor application. Then, change the name of the alias to External Editor
If the Use External Editor checkbox is not enabled, the CodeWarrior editor is the default editor for your text files.
Note that the third-party editor is not used for text editing unless the file you are working with has been added to the currently open Project window.
To learn how to add files to the Project window, refer to "Adding Files" on page 77.
Enable automatic Toolbar help (Mac OS)
This checkbox toggles on and off the Balloon Help for the toolbar icons. When you move the mouse over an icon and leave it there for a second or two, a balloon pops up and tells you more about the command represented by the icon.
Use Script menu (Mac OS, Solaris, and Linux)
When this checkbox is enabled, the Script Menu is displayed in the IDE's menu bar.
For more information about the Script Menu and scripting the IDE with AppleScript, refer to Targeting Mac OS.
Use ToolServer menu (Mac OS)
This checkbox toggles the display of the Tools menu (Figure 8.7) in the IDE's menu bar. For more information about using this menu, refer to Targeting Mac OS.
Figure 8.7 ToolServer Menu

Use BBEdit Extensions (Mac OS)
When this checkbox is enabled, an additional icon displays in the CodeWarrior IDE menu bar, as shown in Figure 8.8. This icon is useful for accessing BBEdit extensions from within CodeWarrior.
For more information about BBEdit, refer to its documentation.
Figure 8.8 BBEdit Extensions Menu Icon

Find Reference using (Mac OS)
This pop-up menu lets you select an online database application to look up references and definitions. The following formats are supported:
CodeWarrior documentation in QuickHelp format can be found on the CodeWarrior Reference CD.
To learn more about online reference databases and how to use them, refer to "Online References" on page 158.
Plugin Settings
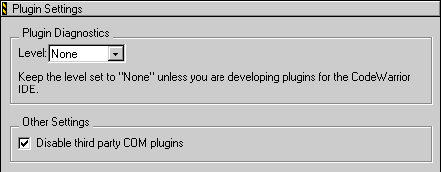
The Plugin Settings panel, shown in Figure 8.9, has options to troubleshoot third-party IDE plug-ins.
To learn how to open the IDE Preferences window and select the Plugin Settings panel, see "Preferences Guided Tour" on page 249.
Figure 8.9 Plugin Settings preference panel
Plugin Diagnostics
The pop-up menu in this section helps the IDE tell you more information about plug-ins that you are developing for CodeWarrior. This information is useful when you experience problems getting your plug-in to function properly, or you want more information about the properties of installed plug-ins.
There are three possible levels of plug-in diagnostics:
None-This is the default setting. No plug-in diagnostics are activated, and no output is produced.
In order to use a specific plug-in diagnostic level, select it from the Level pop-up list.
 NOTE
NOTE
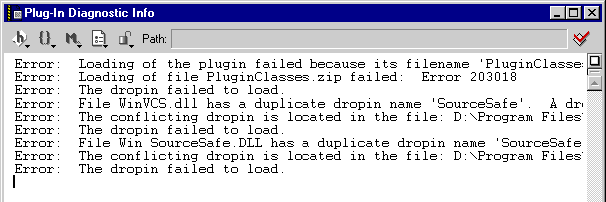
You must restart CodeWarrior for any changes to the diagnostic level to take effect. When you change a plug-in diagnostic level and save that change, CodeWarrior displays a dialog box reminding you to restart.
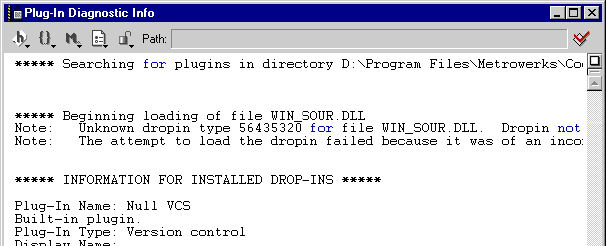
After the text file is generated, you have the option of saving the text file. You can also print out the text file so that you can have a convenient error reference when troubleshooting your plug-ins. CodeWarrior provides suggestions for correcting general plug-in errors in the generated text file.
Figure 8.10 Plugin Diagnostics - Errors Only text file
Disable third party COM plugins
Enable this checkbox to disable all third-party Common Object Model (COM) plug-ins for the IDE. This option is useful for troubleshooting problems with the IDE.
 TIP
TIP
If you experience problems when using the IDE, try disabling third-party COM plug-ins. If the problem does not occur after you disable the plug-ins, then the source of the problem likely involves conflicts between the plug-ins supplied with CodeWarrior and the third-party plug-ins.
Figure 8.11 Plugin Diagnostics - All Info text file
Source Trees
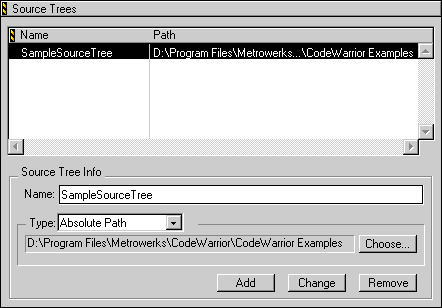
The Source Trees preference panel, shown in Figure 8.12, lets you define global source trees (root paths) for use in your projects. You can define your project's access paths and build-target output in terms of source trees. Using this approach, you can easily share projects across various hosts. You need only make minor changes to the source trees' paths to maintain your project's functionality.
To learn how to open the IDE Preferences window and select the Source Trees preference panel, see "Preferences Guided Tour" on page 249.
There is also a target-specific Source Trees settings panel. For more information about this settings panel, see "Source Trees" on page 339. The source trees you define in the IDE Preferences window can be used for all projects. The source trees defined in the Target Settings window can only be used with the current build target in the active project. If you define the same source trees in both panels, the target-specific source trees take precedence over the global source trees.
Figure 8.12 Source Trees preference panel
Source Trees list
This list shows all of the source trees defined for use with the IDE. The list consists of two columns:
Name
This field is part of the Source Tree Info section shown in Figure 8.12. Use the Name field to enter a name for a new source tree or to change the name of an existing source tree.
Type
This field is part of the Source Tree Info section shown in Figure 8.12. Use the Type field to choose one of the following types of source trees:
Add
To add a new source tree, first select the appropriate type of source tree from the Type pop-up menu. Next, enter a name for the new source tree in the Name field.
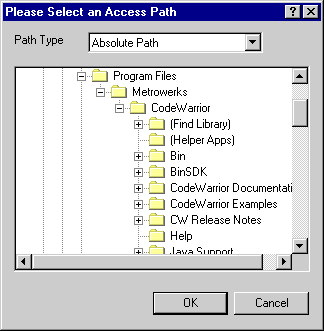
When you create an Absolute Path source tree, the Choose button is available. Click this button to select a path using a standard dialog box, as shown in Figure 8.13 (Windows) and Figure 8.14 (Mac OS).
On the Windows-hosted IDE, you can specify how CodeWarrior stores a path by choosing one of these path type options:
Figure 8.13 Access Path Selection dialog box (Windows)
 NOTE
NOTE
Relative paths allow projects to contain two or more files with identical names. However, for large projects, you might notice slower performance when adding relative paths to a project.
Figure 8.14 Access Path Selection dialog box (Mac OS)
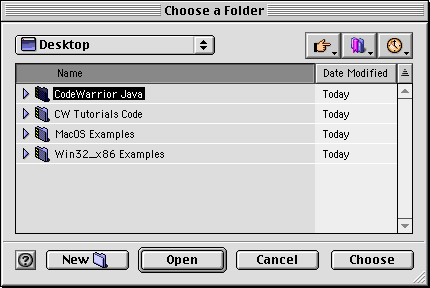
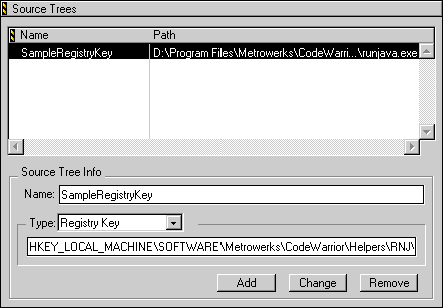
When you create an Environment Variable or Registry Key source tree, the Type field changes to the field shown in Figure 8.15. Enter the path to the environment variable or registry key in this field.
When you finish adding source trees, click the Save button in the IDE Preferences window to save your changes. The source trees are then displayed in the path pop-up menus for your project. For example, if you create a source tree named Sample, you can use it to create an access path, as shown in Figure 8.16 on page 267. You can also define your project's target output in terms of the source trees by using the Output Directory field in the Target Settings panel. For more information about this settings panel, refer to "Target Settings" on page 321.
Figure 8.15 Creating a registry key (Windows)
Change
To change a source tree, first select it in the Source Trees list. Next, modify the Name and Type fields as desired. Then click the Change button. When you finish modifying the source trees, click the Save button in the IDE Preferences window to save your changes.
 NOTE
NOTE
After changing a source tree, you might need to modify your project so that you do not refer to the source tree in its original form. Therefore, the IDE displays a message reminding you to update your project.
If your project's files or libraries are not in the source trees, the IDE will not find them when compiling, linking, or running your project. Therefore, after you change an existing source tree, the IDE displays a message reminding you to update your project.
Figure 8.16 Choosing source trees in access path pop-up menus

Remove
To remove a source tree, first select it in the Source Trees panel. Then, click the Remove button, and the source tree is removed. When you finish removing source trees, click the Save button in the IDE Preferences window to save your changes.
 NOTE
NOTE
After removing a source tree, you might need to modify your project so that you do not refer to the removed source tree. Therefore, the IDE displays a message reminding you to update your project.
Editor Preferences

In this section we discuss preference panels that control the CodeWarrior editor's features. The Editor panels include:
Browser Display
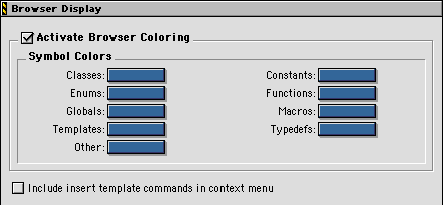
The Browser Display preferences are shown in Figure 8.17.
To learn how to open the IDE Preferences window and select the Browser Display panel, see "Preferences Guided Tour" on page 249.
The Browser can export its lists of symbols and their types to the CodeWarrior editor. This enables the editor to use different colors for displaying various types of symbols. Enable the Activate Browser Coloring checkbox to use this feature. When active, the color choice for each symbol type is displayed in the Editor window and the Browser window. Click on a color sample to change its color.
Enable the Include insert template commands in context menu checkbox to use the context pop-up menus to insert templates into your source code. By default, this option is disabled. When this option is enabled, there is an additional Insert Template command in your context pop-up menus, as shown in Figure 7.4 on page 212.
Figure 8.17 Browser Display options
Editor Settings
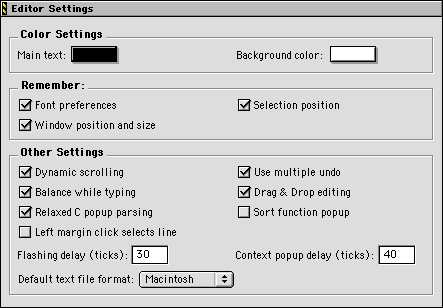
This section tells you how to configure the CodeWarrior editor's behavior to make your text-editing chores easier. The Editor Settings panel is shown in Figure 8.18.
To learn how to open the IDE Preferences window and select the Editor Settings panel, see "Preferences Guided Tour" on page 249.
This preference panel has three groups of options: Color Settings, Remember, and Other Settings. The Color Settings control the main text color (non-syntax) and the background color in the Editor and Browser windows. The Remember options determine the Editor window settings that are saved from one programming session to the next. Other Settings (such as Dynamic scrolling and Balance while typing) control how the editor works.
Color Settings
The following options control the color settings for the editor.
Main text
This option configures the color of any text not colored by the Browser Display, Syntax Coloring, or Custom Keywords color sets. Click the color sample to change the color using the operating system's standard color selection window.
Background color
Click the color sample to change the background color of the Editor and Browser windows using the operating system's standard color selection window.
Figure 8.18 Editor Settings preference panel
Remember
These options control which settings the editor remembers between programming sessions.
Font preferences
You can configure the font information for an individual file if you enable this checkbox. Otherwise, all files inherit the default font settings from the CodeWarrior IDE.
Window position and size
Enabling this checkbox saves each window's position and size so that files open in the same location on the screen each time. This feature requires that your editor files be writable. To learn more about writable files, refer to "Common VCS Operations" on page 593.
Selection position
Enabling this checkbox tells the CodeWarrior IDE to remember what part of a file's text was visible, the location of the insertion point, and any selections that were made. Disable this checkbox if you always want the editor to go to the top of the file when it opens a window. This feature requires that your files be writable. To learn more about writable files, refer to "Common VCS Operations" on page 593.
Other Settings
These options control other behaviors that the editor remembers between programming sessions.
Dynamic scrolling
(Mac OS, Solaris, and Linux) When this checkbox is enabled, the text in an Editor window visually scrolls while you drag the scroll box in the scrollbar. To temporarily disable this option, hold down the Option key while dragging the scroll box.
Balance while typing
When this checkbox is enabled, the IDE checks for balanced parentheses, brackets, and braces as you type. Each time you type a right parenthesis, bracket, or brace, the editor attempts to locate the matching left counterpart. If the counterpart is found, the editor brings it into view, highlights it for a specified length of time called the Flashing delay, and returns to where you were typing. If the counterpart is not found, the editor beeps. By default, the Balance while typing checkbox is enabled. To learn more about the Flashing delay, refer to "Flashing delay" on page 272.
 TIP
TIP
If you want to check for balanced punctuation without highlighting it, set the Flashing delay to 0.
Relaxed C popup parsing
Enable this checkbox if you use style-coding conventions as described in "Reference Manual," of The C Programming Language, Second Edition (Prentice Hall) by Kernighan and Ritchie (K&R). Enabling the checkbox allows the CodeWarrior IDE to recognize the K&R style coding conventions in your source code and properly display function names in the Routine pop-up menu. Disable the checkbox if you use non-standard macros that can interfere with K&R-styled code.
 NOTE
NOTE
Some macro functions are not recognized when the Relaxed C popup parsing checkbox is enabled. If you encounter problems while viewing routine names, disable this checkbox and try again.
Left margin click selects line
When this checkbox is enabled, moving the cursor to the left edge of an editor window changes the cursor's icon to a right-pointing arrow. Clicking along the left margin of the window with the right-pointing arrow selects the line next to the cursor. Clicking and dragging the right-pointing arrow selects more than one line. When this checkbox is disabled, the cursor's icon is a left-pointing arrow. The left-pointing arrow cannot select an entire line with a click.
Use multiple undo
When this checkbox is enabled, you can undo and redo multiple actions. When this checkbox is disabled, you can only undo or redo the most recent action that you performed. See "Redo, Multiple Undo, and Multiple Redo" on page 604 for more information.
Drag & Drop editing
This checkbox enables Drag and Drop support in the editor. To learn more about this feature, refer to "Moving Text (Drag and Drop)" on page 150.
Sort function popup
Enable this checkbox if you want to alphabetically sort the items listed in the Editor window's Routine Pop-Up Menu. To learn more about this feature, refer to "Routine Pop-Up Menu" on page 136.
Flashing delay
The Flashing delay is the amount of time the CodeWarrior editor displays and highlights an item. It is measured in 60ths of a second. This option is for balancing punctuation. To learn more about this setting, refer to "Balancing Punctuation" on page 150 and "Balance while typing" on page 271.
 WARNING!
If you enter 0 for the Flashing delay, you disable flashing entirely.
Context popup delay
(Mac OS, Solaris, and Linux) This option determines the minimum length of time to hold down the mouse button before the Browser Contextual Menu displays. The range of acceptable values is 0 to 240. Each interval represents 1/60th of a second (16.67 milliseconds). To learn more about this browser feature, refer to "Browser Contextual Menu" on page 211 and "Using the Contextual Menu" on page 242.
 WARNING!
If you enter 0 for the Context pop-up delay, you disable the pop-up menu entirely.
Default text file format
This pop-up menu sets the end-of-line conventions that the CodeWarrior IDE uses to create new files. You can choose from three formats: Macintosh, DOS, and UNIX. To learn about saving text files in different text formats, see "Options Pop-Up Menu" on page 138.
Font & Tabs
The Font & Tabs preference panel is shown in Figure 8.19. This panel sets the font and tab information for the active Editor window. If no Editor window is open, the panel's settings apply to the CodeWarrior IDE defaults.
To learn how to open the IDE Preferences window and select the Font & Tabs panel, see "Preferences Guided Tour" on page 249.
Figure 8.19 Font & Tabs preference panel
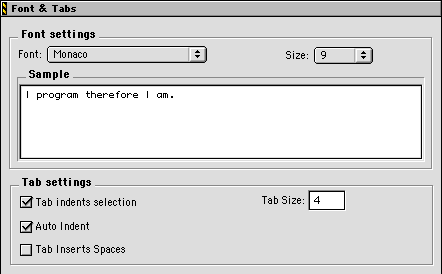
To change the font and tab settings for a file, open an Editor window for that file. Then, open the IDE Preferences window, select the Font & Tabs preference panel, and make your changes. Each time you open that file in the future, the editor remembers the font and tab preferences that you set.
As long as you have write permissions on the file (that is, the file is not Read-Only), the IDE remembers your changes. To learn more about writable files, refer to "Common VCS Operations" on page 593.
Font
Use this pop-up menu to choose your desired text font.
Size
Use this pop-up menu to choose your desired font size.
Sample
This field provides sample text that reflects the current settings in the Font and Size fields.
Tab Settings
These options control the use of tabs in the CodeWarrior IDE.
Tab indents selection
When this checkbox is enabled, you can select some lines of text and press the Tab key to insert a tab in front of each selected line. The inserted tabs do not replace the existing text. When the checkbox is disabled, selected lines are completely replaced with tabs. The checkbox is enabled by default.
Auto Indent
Enable this checkbox if you want the editor to automatically create a new line with the same indentation as the previous line.
Tab Inserts Spaces
Enable this checkbox to insert spaces in the text when you press the Tab key. You can specify the number of inserted spaces in the Tab Size field.
Tab Size
This field represents the width of a tab, measured in spaces, when you press the Tab key.
Syntax Coloring
The Syntax Coloring preference panel, shown in Figure 8.20, includes options for setting the color of comments, keywords, strings, and custom keyword sets. Enable the Use Color Syntax checkbox to display your text files according to the colors defined in this panel.
To learn how to open the IDE Preferences window and select the Syntax Coloring panel, see "Preferences Guided Tour" on page 249.
Figure 8.20 Syntax Coloring preference panel

You can assign a particular color to four distinct sets of words. Each of these custom keyword sets can contain routine names, type names, or anything else you want to highlight in an Editor window. Table 8.1 describes the text elements for which you can set a color.
Table 8.1 Syntax coloring elements
Element
|
Description
|
|---|
Comments
|
Code comments. In Java, C, or C++, comments are placed between /* and */ or from // to the end of the line. In Pascal, comments are place between { and } or between (* and *).
|
Keywords
|
The programming language's keywords. This element does not include macros, types, variables defined by system interface files, or variables that you define.
|
Custom Keywords
|
Any keyword listed in the Custom Keyword List. This list is useful for macros, types, and other names that you want to highlight.
|
Strings
|
Anything that is not a comment, keyword, or custom keyword, such as literal values, variable names, routine names, and type names.
|
Changing syntax highlighting colors
The CodeWarrior IDE can use different colors for each type of text. To change these colors, click the color sample beside the name. The CodeWarrior IDE displays a standard dialog box for you to select a new color. The next time you view a text file, the CodeWarrior IDE uses the new color.
Controlling syntax highlighting within a window
Use the Syntax Coloring command in the Options Pop-Up Menu to enable or disable syntax coloring as you view a particular file. For more information, see "Options Pop-Up Menu" on page 138.
Using color for custom keywords
Use the Custom Keywords dialog box to choose additional words to display in color. These words can be macros, types, or other names that you want to highlight. The custom keywords are global to the CodeWarrior IDE and apply to every project.
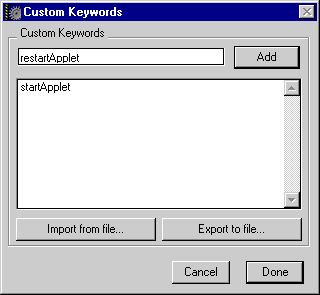
Click the Edit button to the right of the custom keyword set you want to modify. The CodeWarrior IDE displays the Custom Keywords dialog box, shown in Figure 8.21.
Type the custom keyword in the field at the top of the Custom Keywords dialog box, then click Add. The IDE adds the custom keyword to the Custom Keywords List. You can add as many custom keywords as desired. However, due to the way the IDE handles these words, you might not be able to add custom keywords to a large Custom Keywords List. If the IDE is unable to add a custom keyword to the list, it displays an error message.
To delete a custom keyword, select it and press Backspace/Delete. The CodeWarrior IDE removes the custom keyword from the Custom Keywords List.
Once you finish entering custom keywords, click Done. The dialog box disappears. The next time you view a source file, all of your custom keywords are highlighted in the selected color.
 TIP
TIP
You can also set target-specific colors for custom keywords. To learn more about this, see "Custom Keywords" on page 352.
Figure 8.21 Custom Keywords dialog box
Importing or exporting custom keywords
You can import existing custom keyword sets for use in the IDE, or you can export your custom keyword sets for use in another host.
To import a custom keyword set, follow these steps:
1. Click the Edit button next to the desired custom keyword set in the Syntax Coloring preference panel.
The IDE displays the Custom Keywords dialog box.
2. Click Import from file.
A standard Open dialog box displays.
3. Use the dialog box controls to select the custom keyword set you wish to import.
4. Click Open.
The IDE adds the custom keywords from the selected set to the Custom Keywords list.
5. Click Done.
The imported custom keywords become part of your custom keyword set.
To export a custom keyword set, follow these steps:
1. Click the Edit button next to the desired custom keyword set in the Syntax Coloring preference panel.
The IDE displays the Custom Keywords dialog box.
2. Click Export to file.
A standard Save dialog box displays.
3. Use the dialog box controls to select a location to save the exported custom keyword set.
If you plan to use the exported custom keyword set on a different host, you should add a ".txt" extension (without the quotes) to the set's name. The Windows-hosted IDE requires this extension in order to identify the custom keyword set.
4. Click Save.
The IDE exports the custom keyword set and saves it to your hard disk.
5. Click Done.
You return to the Syntax Coloring preference panel.
Debugger Preferences

In this section we discuss preference panels that control debugger features. The debugger panels include:
Display Settings
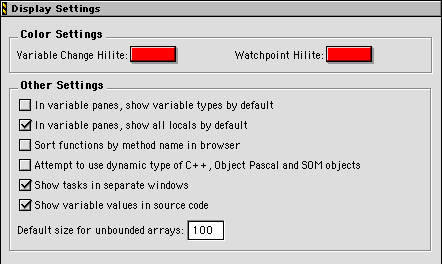
You can configure the CodeWarrior debugger to accommodate the way you work. The Display Settings panel is shown in Figure 8.22.
To learn how to open the IDE Preferences window and select the Display Settings panel, see "Preferences Guided Tour" on page 249.
Figure 8.22 Debugger Display Settings preference panel
Variable Change Hilite
This option lets you set the color that the debugger uses to identify a changed variable. To change the current color, click the color sample beside the name. The CodeWarrior IDE displays a standard dialog box for you to select a new color. The next time you view debugging windows, the CodeWarrior IDE uses the new color.
Watchpoint Hilite
This option lets you set the color that the debugger uses to identify a watchpoint. To change the current color, click the color sample beside the name. The CodeWarrior IDE displays a standard dialog box for you to select a new color. The next time you view debugging windows, the CodeWarrior IDE uses the new color.
In variable panes, show variable types by default
Enable this checkbox to show variable types when you open a new Variable window.
In variable panes, show all locals by default
Enable this checkbox to show all local variables when you open a new Variable window. When this option is enabled, the Variables pane listing is always Variables:All. When this option is disabled, the Variables pane listing can be either Variables:All or Variables:Auto, depending on the previous state. See "Variables pane" on page 398 for more information about these states.
Sort functions by method name in browser
Changes the way C++, Object Pascal, and Java functions are sorted in the Browser window. When this checkbox is disabled, function names of the form className::methodName are sorted alphabetically by class name first, then by method name. Enabling this checkbox causes the functions to be alphabetized directly by method name. Since most C++, Object Pascal, and Java source-code files tend to contain methods all of the same class, this preference makes it easier to select methods by typing from the keyboard.
Attempt to use dynamic type of C++, Object Pascal and SOM objects
Enabling this checkbox displays the runtime type of C++ or Object Pascal objects. Disabling this checkbox displays an object's static type only.
Show tasks in separate windows
This checkbox lets you toggle between two ways of displaying tasks. When the checkbox is enabled, double-clicking a task in the Processes Window brings up a separate Stack Crawl Window to display the code. When the checkbox is disabled, the Task pop-up menu is displayed at the top of the Stack Crawl Window. Use this menu to choose a task to display in the Stack Crawl Window.
 NOTE
NOTE
The effect of this option does not occur immediately. The setting that is active for the start of a debugging session stays active for the duration of that session. If you change this setting in the middle of a debugging session, you must stop debugging and then restart debugging to make the new preference take effect.
Show variable values in source code
Enable this option to automatically display variable values in your source code. When disabled, the variable values are not displayed.
Default size for unbounded arrays
Use this field to specifies the array size to use when no size information is available.
Windowing
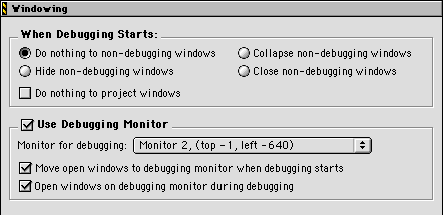
The Windowing preference panel, shown in Figure 8.23 (Windows) and Figure 8.24 (Mac OS), allows you to configure window behavior when you start a debugging session.
To learn how to open the IDE Preferences window and select the Windowing panel, see "Preferences Guided Tour" on page 249.
Figure 8.23 Windowing preference panel (Windows)

When Debugging Starts
The following settings determine what the IDE does with non-debugging windows when a debugging session begins.
Do nothing to non-debugging windows
Enable this option so that non-debugging windows are not closed or hidden when debugging begins. Since projects are used to initiate debugging, this setting is useful in situations where multiple build targets or multiple projects are being debugged.
Hide non-debugging windows
Enable this option to hide, but not close, non-debugging windows. Use the Window Menu to access the non-debugging windows when they have been hidden. Double-clicking files in the Project window and performing symbol lookups also shows the hidden windows. At the end of the debugging session, windows that were hidden are made visible.
Minimize non-debugging windows (Windows)
Enable this option to minimize non-debugging windows. Use the Window Menu to access the non-debugging windows when they have been minimized. Double-clicking files in the Project window and performing symbol lookups also expands the minimized windows. At the end of the debugging session, windows that were minimized are expanded. Note that this option is available only when CodeWarrior is in MDI mode. For more information, see "IDE Extras" on page 254 and "Use Multiple Document Interface (Windows)" on page 256.
Collapse non-debugging windows (Mac OS)
Enable this option to collapse all non-debugging windows. Use the Window Menu to access the non-debugging windows when they have been collapsed. Double-clicking files in the Project window and performing symbol lookups also expands the collapsed windows. At the end of the debugging session, windows that were collapsed are expanded.
Close non-debugging windows
Enable this option to close all non-debugging windows, except for the Project window of the project being debugged. At the end of the debugging session, windows that were closed are re-opened.
Multi-Monitor Debugging (Mac OS)
The following options, shown in Figure 8.24, are displayed only when you have more than one monitor connected to your computer. These options help you manage debugging windows across your multiple-monitor setup. Enable the Use Debugging Monitor checkbox to use CodeWarrior's multiple-monitor debugging features.
Monitor for debugging
Use this pop-up menu to select the monitor you wish to use during debugging sessions. The coordinates in parentheses identify the selected monitor in QuickDraw space.
Move open windows to debugging monitor when debugging starts
When you enable this option, all open windows are moved to the selected debugging monitor when you begin a debugging session. At the end of the debugging session, windows that were moved are restored to their original positions.
Open windows on debugging monitor during debugging
When you enable this option, any window that opens during a debugging session is displayed on the selected debugging monitor. The IDE does not save a window's position on the debugging monitor if that window is closed during the debugging session. This behavior prevents window positions from gravitating to the debugging monitor.
Figure 8.24 Windowing preference panel (Mac OS)
Global Settings
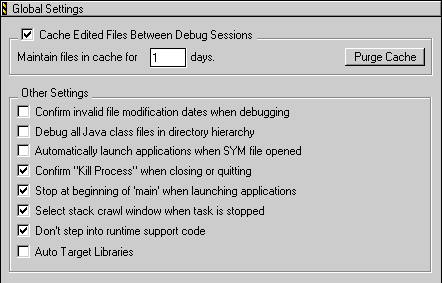
This section describes how to configure the debugger's behavior to make your debugging chores easier. The Global Settings preference panel is shown in Figure 8.25.
To learn how to open the IDE Preferences window and select the Global Settings panel, see "Preferences Guided Tour" on page 249.
Cache Edited Files Between Debug Sessions
Enable this checkbox to maintain a cache of edited files between debugging sessions. When enabled, you can specify the number of days to store the cache in the Maintain files in cache for field. You can also reset the file caches by clicking the Purge Cache button. When the checkbox is disabled, the IDE does not maintain a cache.
Figure 8.25 Global Settings preference panel
Confirm invalid file modification dates when debugging
The debugger keeps track of the modification dates of source files from which a symbolics file is created. When the modification dates do not match, the debugger can display an alert box warning you of possible discrepancies between the object code and the source code. When this checkbox is enabled, the debugger displays the warning.
Debug all Java class files in directory hierarchy
This checkbox applies when you want to debug a Java program, but you do not have a project file open.
When this checkbox is enabled and you begin a Java debugging session, the debugger searches for additional symbolics files to open. This search occurs in the same folder as the opened class file and includes all of the subfolders. When the checkbox is disabled, only the opened class file is debugged.
Automatically launch applications when SYM file opened
Enable this checkbox to automatically launch a target program when its symbolics file is opened and set an implicit breakpoint at the program's main entry point. Disabling the checkbox lets you open a symbolics file without launching the program, so that you can examine object code that executes before the main routine, such as C++ static constructors. You can also avoid launching the target program by holding down the Alt/Option key when opening a symbolics file.
Confirm "Kill Process" when closing or quitting
Enabling this checkbox causes the IDE to prompt you for confirmation before aborting a process when a target program is killed.
Stop at beginning of `main' when launching applications
When you enable this checkbox and begin debugging an application, the debugger stops at the first line of main(). You must then choose the Run command a second time to continue past that point. Disabling the checkbox means that when you debug your application, the debugger does not stop at main() and instead runs free. This option is most useful between debugging sessions, after you set all of your breakpoints.
Select stack crawl window when task is stopped
Enabling this checkbox automatically brings the Stack Crawl window to the front when a task is stopped. If the checkbox is disabled, the Stack Crawl window remains in its previous position. This option is useful if you have several Variable windows open and want to see the variables change as you step through your code. You can control the Stack Crawl window even if it is not the currently active window.
Don't step into runtime support code
Enabling this checkbox causes the IDE to execute constructor code for C++ static objects normally, without displaying it in the Stack Crawl window.
Auto Target Libraries
This checkbox applies when you use the debugger to debug a file that is not a project file, such as when you attach a running process. For more information about attaching processes, see "Processes window toolbar" on page 425
Enable the Auto Target Libraries checkbox to let the IDE attempt to debug dynamically linked libraries (DLLs) that are loaded by the target application. The IDE attempts to automatically debug the loaded DLLs for which symbolics information is available.
 NOTE
NOTE
You might notice slower performance when you enable the Auto Target Libraries checkbox. If you encounter this problem, try disabling the checkbox to improve the IDE's performance.
Java Settings (Windows)
The Java Settings preference panel, shown in Figure 8.26, lets you configure general Java debugger settings. For more information about debugging Java programs and applets, see Targeting Java.
To learn how to open the IDE Preferences window and select the Java Settings panel, see "Preferences Guided Tour" on page 249.
Figure 8.26 Java Settings preference panel

Class for Debugging
Edit this field to specify the class file you want to debug.
Program Arguments
Edit this field to specify command-line arguments to be used by your project when a Java application is debugged.
JView Arguments
Edit this field to specify any arguments JView might require while debugging your project.
MetroNub Settings (Mac OS)
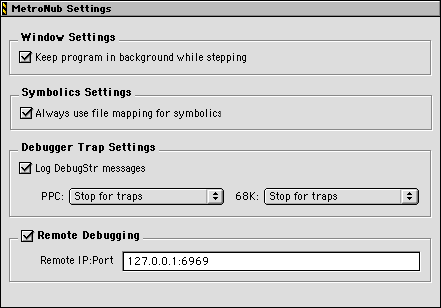
The MetroNub Settings preference panel is shown in Figure 8.27. To learn how to open the IDE Preferences window and select the MetroNub Settings panel, see "Preferences Guided Tour" on page 249.
Figure 8.27 MetroNub Settings preference panel (Mac OS)
Keep program in background while stepping
Enable this checkbox to step through a program's code while the program is running in the background. This option accelerates stepping and avoids screen flicker. If you disable the checkbox, the program's windows briefly come to the foreground and then return to the background. With rapid stepping, the constant movement of the program's windows results in screen flicker.
 WARNING!
The Keep program in background while stepping option might affect the execution of your program if the program behaves differently in the background than in the foreground.
Always use file mapping for symbolics
This checkbox determines whether MetroNub or the IDE handles symbolics files. Enable this checkbox to let MetroNub handle the files. Disable this checkbox to let the IDE handle the files. This checkbox is enabled by default.
Debugger Trap Settings
These settings determine how the debugger handles Debugger() and DebugStr() traps when they are encountered during a program's execution.
Log DebugStr messages
Enable this checkbox to log DebugStr() messages when the debugger encounters them during a program's execution. If you do not want to log these messages, disable the checkbox.
PPC
Use this pop-up menu to determine how the debugger handles PowerPC traps. You can choose to let MacsBug handle the traps (MacsBug handles traps), halt the program's execution after executing the traps (Stop for traps), or disregard the traps and continue the program's execution (Ignore traps).
68K
Use this pop-up menu to determine how the debugger handles 68K traps. You can choose to let MacsBug handle the traps (MacsBug handles traps), halt the program's execution after executing the traps (Stop for traps), or disregard the traps and continue the program's execution (Ignore traps).
Remote Debugging
Enable this checbox if you want to enable remote debugging of Mac OS 8 or Mac OS X projects from your computer.
Remote IP:Port
Enter in this field the Internet Protocol (IP) address of the remote computer, followed by a colon, followed by the port ID number of the remote computer. Sample values are displayed in the field.
x86 Settings (Mac OS)
The x86 Settings preference panel, shown in Figure 8.28, lets you set up your Mac OS computer to connect to a remote Windows computer for debugging sessions. To learn more about the x86 Settings panel, see Targeting Mac OS.
Figure 8.28 x86 Settings preference panel (Mac OS)

To learn how to open the IDE Preferences window and select the x86 Settings panel, see "Preferences Guided Tour" on page 249.
Remote debugging
Enable this checkbox if you want to enable remote debugging of Windows projects from your computer.
Remote IP Address
Use this field if you have a network connection to the remote computer you plan to use for debugging. Enter in this field the Internet Protocol (IP) address of the remote computer.
Port ID
Use this field if you have a serial connection to the remote computer you plan to use for debugging. Enter in this field the port ID number of the remote computer.
 NOTE
NOTE
You should leave the port ID number at its default setting. Changing the default number might cause CodeWarrior to fail to connect to the remote computer.
Customizing the IDE

The IDE lets you customize menus, key bindings, and toolbars to better suit your programming needs. You customize these items in the Customize IDE Commands window. To display this window, choose Commands & Key Bindings from the Edit menu.
This section discusses the following topics:
Dialog Box Buttons

There are several dialog box buttons in the Customize IDE Commands window that control how settings are used and applied.
The topics in this section are:
Discarding changes
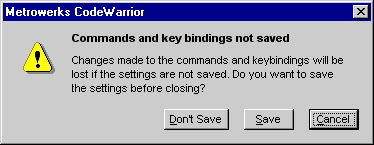
If you change the settings in the Customize IDE Commands window and then try to close the window, CodeWarrior displays the dialog box shown in Figure 8.29. To discard your changes, click Don't Save. To keep your changes, click the Save button. To discard your changes and return to the Customize IDE Commands window so that you can continue making changes, click Cancel.
Figure 8.29 Commands and Key Bindings Confirmation Dialog Box
Factory Settings button
The Factory Settings button causes the Customize IDE Commands window to revert to the settings that CodeWarrior uses as defaults.
 WARNING!
All settings are reset to their defaults when you click the Factory Settings button. If you do not export your customized command groups or menu commands before restoring the default settings, your customized items will be lost. See "Exporting commands and key bindings" on page 303 for more information about exporting command groups and menu commands.
Revert Panel button
The Revert Panel button lets you undo changes to the Customize IDE Commands window. Clicking this button causes the window to reset to its last saved state. This is useful when you decide against the changes you made.
Save button
The Save button commits all of the current settings in the Customize IDE Commands window. After closing the window, CodeWarrior behaves according to the settings that you saved.
Customizing Commands

You can customize the menu commands that are displayed in the CodeWarrior IDE's menu bar. You can control the display of menu commands, create new command groups in which to place menu commands, and create new commands associated with a command line (Windows) or a script (Mac OS). The customized commands you create have access to IDE information, such as the current editor selection, the frontmost window, the current project, and the output file of the current project.
For example, you might wish to create a command group called MyMenu and place in it a command called RunApp, which launches an external application. You could define this new command group and command in the Customize IDE Commands window.
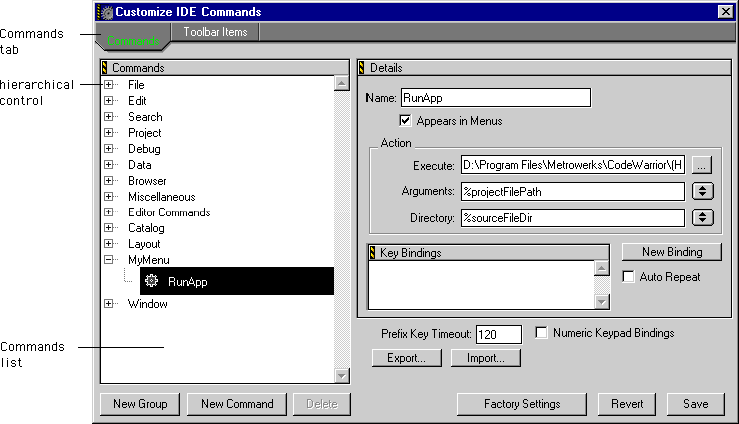
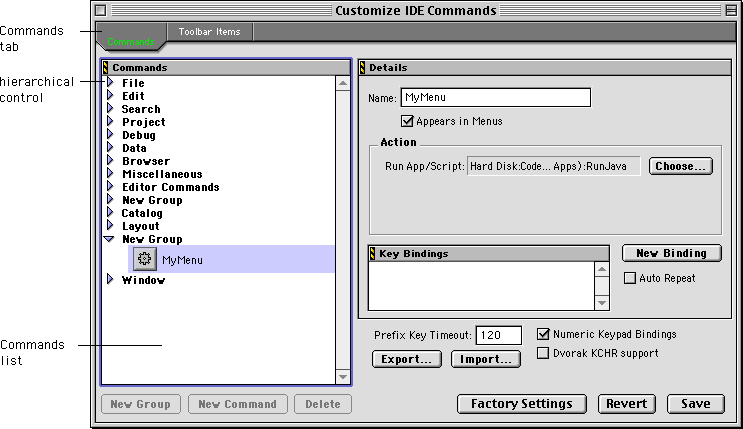
Click the Commands tab at the top of the Customize IDE Commands window to display the Commands view, shown in Figure 8.30 on page 292 (Windows) and Figure 8.31 on page 296 (Mac OS). You use this view to create and modify new command groups and commands for use with the IDE.
The topics discussed in the section are.
Figure 8.30 Customize IDE Commands - Custom Commands (Windows)
Modifying existing command groups and menu commands
You can use the Commands view of the Customize IDE Commands window to examine and modify existing command groups and menu commands. The Commands view includes a Commands list, shown in Figure 8.30. This hierarchical list organizes the IDE's menu commands into command groups. Click the hierarchical control next to a command group to expand that group and view its contents.
To examine a particular item, select it in the Commands list. The information for the selected item is displayed on the right-hand side of the Customize IDE Commands window. The following information is provided for each item:
Adding customized command groups and menu commands
The Customize IDE Commands window lets you add new menu commands to CodeWarrior's menu bar and arrange those new commands into command groups. The menu commands you create can run a command line (Windows) or an application or script (Mac OS).
Click the Commands tab at the top of the Customize IDE Commands window to display the Commands view, shown in Figure 8.31 on page 296 (Windows) and Figure 8.30 on page 292 (Mac OS). You use this view to create new menu commands and arrange them into command groups. The top-most level of the Commands list shows existing command groups. The contents of these groups show existing menu commands.
This section discusses the following topics:
Creating command groups
To create a new command group in which to place menu commands, follow these steps:
1. Click the New Group button.
The IDE creates a new command group named New Group, adds it to the Commands list, and displays its information in the Customize IDE Commands window. The new command group is displayed in alphabetical order with existing command groups in the Commands list.
2. Enter a name for the new command group.
You can change the default name of New Group. Type the new name in the Name field of the Customize IDE Commands window.
3. Enable or disable the display of the new command group.
The Appears in Menus checkbox controls the display of the new command group in CodeWarrior's menu bar. When the checkbox is enabled, the command group is displayed in the menu bar. When the checkbox is disabled, the command group is not displayed. Set this preference as desired.
Creating commands
To create a new menu command, follow these steps:
1. Select a group in which to place the new menu command.
You must select an existing group in the Commands list. To create a new command group in which to place the menu command, follow the steps described in "Creating command groups" on page 294.
2. Click the New Command button.
The IDE creates a new menu command named New Command and places it in alphabetical order within the selected command group. The information for the new menu command is displayed in the Customize IDE Commands window.
3. Enter a name for the new menu command.
You can change the default name of New Command. Type the new name in the Name field of the Customize IDE Commands window.
4. Enable or disable the display of the new menu command.
The Appears in Menus checkbox controls the display of the new menu command in the selected command group. When the checkbox is enabled, the menu command is displayed in the command group. When the checkbox is disabled, the menu command is not displayed. Set this preference as desired.
5. Define the desired Action for the new menu command.
See Defining command actions (Windows) or Defining command actions (Mac OS) for more information.
Defining command actions (Windows)
After creating a new menu command as described in "Creating commands" on page 294, the Customize IDE Commands window displays three fields in the Action section. These fields help you define the action to be performed by the new menu command:
Defining command actions (Mac OS)
After creating a new menu command as described in "Creating commands" on page 294, the Customize IDE Commands window displays the Run App/Script field. This field, shown in Figure 8.31, appears in the Action section of the window. Click the Choose button next to the field to display a standard Open dialog box. Use the dialog box controls to select an application or script. The IDE launches this application or script when you use the menu command. The path to the selected application or script is displayed in the Run App/Script field.
Figure 8.31 Customize IDE Commands - Custom Commands (Mac OS)
Deleting customized command groups and menu commands
You can delete the command groups and menu commands that you create for use with the IDE. Once removed, the command groups are no longer displayed and the menu commands no longer activate their associated command lines (Windows) or applications or scripts (Mac OS).
 TIP
TIP
If you only need to temporarily remove your customized command groups and menu commands, consider exporting your settings. Using this approach, you do not need to reconstruct your settings when you need to use them in the future. Instead, you can import your settings into the IDE and conveniently make them available for use once again. See "Exporting commands and key bindings" on page 303.
To delete a command group or menu command, follow these steps:
1. Select the command group or menu command you wish to delete.
If necessary, click the hierarchical control next to a group to expand and view its contents.
2. Click the Delete button.
After clicking the Delete button, shown in Figure 8.31, the selected command group or menu command is removed from the Commands list.
Customizing Key Bindings

You can customize the keyboard shortcuts used for menu, keyboard, and editor commands in the CodeWarrior IDE. You can attach, or "bind," a set of keystrokes to virtually any command. When you want to activate the command, you can type its associated keystroke set, or "key binding." The Customize IDE Commands window lets you change the default IDE key bindings.
For example, you might wish to change the key binding for "Move Line Up" from the Up-Arrow key to the keystroke Shift-Up Arrow. You could change this keyboard shortcut by changing the key binding for the command in the Customize IDE Commands window.
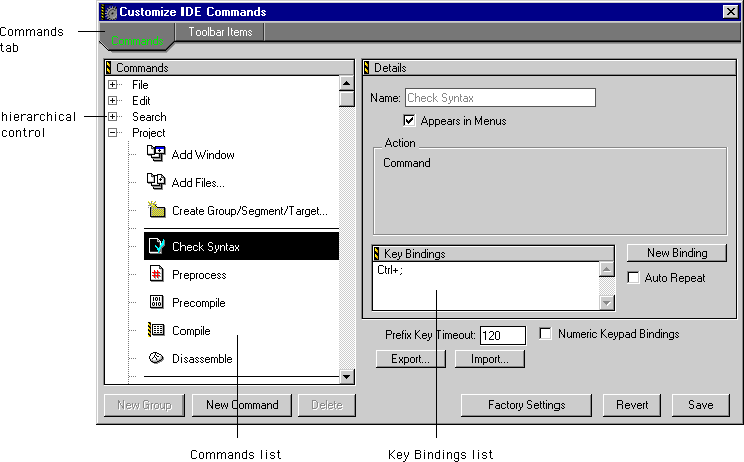
Click the Commands tab at the top of the Customize IDE Commands window to display the Commands view, shown in Figure 8.32. You use this view to set the key bindings for menu commands, editor actions, and other miscellaneous actions. You can also specify special prefix keys. For a detailed list of default key bindings, see "IDE Default Key Bindings" on page 640.
The topics discussed in this section are:
Figure 8.32 Customize IDE Commands - Key Bindings
 NOTE
NOTE
(Solaris and Linux) By default, the Solaris- and Linux-hosted CodeWarrior IDE uses the same modifier key names as used for Mac OS (Shift, Command, Option, and Control). Likewise, the Customize IDE Commands window uses Mac OS symbols to represent modifier keys. Table 17.1 on page 642 shows the default modifier key mappings and the symbols used to represent them. On Solaris and Linux computers, modifier keys can be mapped to any key on the keyboard via the Keyboard Preferences dialog box in the Info menu. When reading this manual, you will need to keep the Keyboard Preferences settings in mind. See "Keyboard Preferences Dialog Box" on page 667 for more information on changing the default modifier key mappings.
Restrictions on choosing key bindings
When you customize key bindings, you need to be aware of some restrictions on keys that can and cannot be used. These restrictions include the following:
Modifying key bindings
The Commands view of the Customize IDE Commands window includes a Commands list, shown in Figure 8.32 on page 298. This hierarchical list organizes the IDE's commands into categories. Click the hierarchical control next to a category to expand that category and view its contents.
To modify a key binding, follow these steps:
1. Select the command you wish to modify from the Commands list.
You might need to click the hierarchical control next to the appropriate category in order to view the individual commands.
 NOTE
NOTE
If you want to use your keyboard's numeric keypad as part of the new key binding, enable the Numeric Keypad Bindings checkbox in the Customize IDE Commands window.
2. Double-click the key binding you wish to change in the Key Bindings list.
The Key Bindings list is shown in Figure 8.32 on page 298. After double-clicking the desired command in this list, the IDE displays the Edit Key Binding dialog box, shown in Figure 8.33.
Figure 8.33 Edit Key Binding dialog box

3. Press the key combination you wish to use for the selected command.
For example, if you want to change the key combination to Control-8, you would press the Control key and the 8 key at the same time.
If you decide against the key combination you just entered, or if you make a mistake, click the Cancel button in the Edit Key Binding dialog box. The IDE returns you to the Customize IDE Commands window.
 NOTE
NOTE
(Mac OS) If you are using a Dvorak keyboard and you are experiencing problems with the Command key being recognized, enable the Dvorak KCHR Support checkbox in the Customize IDE Commands window.
4. Click OK in the Edit Key Binding dialog box.
The new key binding is displayed in the Key Bindings list of the Customize IDE Commands window.
5. Click the Save button in the Customize IDE Commands window to save your changes.
The new key binding is now available for use in the IDE.
Adding key bindings
In addition to modifying key bindings, the Customize IDE Commands window also lets you specify additional key bindings for a particular command.
To add a key binding, follow these steps:
1. Select the command from the Commands list to which you want to add a new key binding.
You might need to click the hierarchical control next to the appropriate category in order to view the individual commands.
 NOTE
NOTE
If you want to use your keyboard's numeric keypad as part of the new key binding, enable the Numeric Keypad Bindings checkbox in the Customize IDE Commands window.
2. Click the New Binding button.
The New Binding button is shown in Figure 8.32 on page 298. After clicking this button, the IDE displays the Edit Key Binding dialog box, shown in Figure 8.33 on page 300.
3. Press the key combination you wish to use for the selected command.
For example, if you want to add the key combination Control-8, you would press the Control key and the 8 key at the same time.
If you decide against the key combination you just entered, or if you make a mistake, click the Cancel button in the Edit Key Binding dialog box. The IDE returns you to the Customize IDE Commands window.
 NOTE
NOTE
(Mac OS) If you are using a Dvorak keyboard and you are experiencing problems with the Command key being recognized, enable the Dvorak KCHR Support checkbox in the Customize IDE Commands window.
4. Click OK in the Edit Key Binding dialog box.
The new key binding is displayed in the Key Bindings list of the Customize IDE Commands window.
5. Click the Save button in the Customize IDE Commands window to save your changes.
The new key binding is now available for use in the IDE.
Deleting key bindings
You can delete key bindings that you do not plan to use with the CodeWarrior IDE. Once removed, the key bindings no longer activate the selected command.
To delete a key binding, follow these steps:
1. Select the command from the Commands list that contains the key binding you wish to delete.
You might need to click the hierarchical control next to the appropriate category in order to view the individual commands.
2. Select the key binding you wish to delete from the Key Bindings list.
The Key Bindings list is shown in Figure 8.32 on page 298.
3. Press Backspace/Delete.
The IDE removes the selected key binding from the Key Bindings list.
4. Click the Save button in the Customize IDE Commands window to save your changes.
The removed key binding no longer activates the selected command.
Setting Auto Repeat for key bindings
The Auto Repeat checkbox, shown in Figure 8.32 on page 298, changes the automatic behavior of the items shown in the Key Bindings list.
Enable the Auto Repeat checkbox to automatically repeat the assigned command while you continue to press the key combination. Disable the checkbox to require the key bindings before activating the assigned command.
A useful example is the Find Next command. If you enable Auto Repeat for the Find Next key binding, then you can just hold down the key combination while you watch the search engine find all the text matching your search criteria in the open file. This is a quick way to jump through a file, finding all the patterns you are looking for and showing them quickly. If you disable Auto Repeat, then you would have to release the keys and press them again every time.
Exporting commands and key bindings
If you wish to save your commands and key bindings in a file so that you can import them into the IDE at another time, you use the Export button in the Customize IDE Commands window. When you click this button, a standard Save dialog box displays. Navigate to the place on your hard disk where you want to save the commands and key bindings file and click Save.
 TIP
TIP
We suggest naming your commands and key bindings file with a .mkb file name extension, like this: MyCmsKbs.mkb. This naming convention helps you quickly identify the file on your hard disk. In addition, the Windows-hosted version of the CodeWarrior IDE uses this extension to identify the commands and key bindings file.
Importing commands and key bindings
If you wish to import saved commands and key bindings from a previously-exported file, click the Import button in the Customize IDE Commands window. When you click this button, a standard Open dialog box displays. Use the dialog box controls to locate and open the commands and key bindings file.
Prefix keys
Prefix keys let you create multiple-keystroke command keys, such as those used in the Emacs text editor available on many different computer platforms. For example, the Emacs key sequence to save a file is Control-X followed by Control-S.
To emulate this Emacs key binding in the CodeWarrior IDE, you can set a prefix key to Control-X, and then set the command key for the Save menu command to Control-X Control-S.
You can also adjust the maximum time to wait for a keypress after typing a prefix key. To learn how to do this, refer to "Setting the Prefix Key Timeout" on page 306.
Quote Key prefix
The Quote Key is a special prefix key with a very simple function. It lets you use a simple printing character as a key equivalent (without any modifier key), and still retain the ability to use that character in regular type in the editor window.
In typical use, a key equivalent involves two keys: a modifier key (such as the Control key) combined with an actual printing key. However, you are not required to have a modifier key in CodeWarrior.
For example, you can assign the key for the number 1 (with no modifier) to a command. However, if you make this assignment, you can no longer simply type a 1 into your code in the editor. The reason for this problem is that the IDE interprets the 1 as a command. The Quote Key prefix is the way around such conflicts.
You can assign any key to be recognized as the Quote Key prefix. For more information, see "Assigning the Quote Key prefix" on page 304. Despite its name, the Quote Key prefix does not have to be the key that creates quote symbols in text.
After typing an assigned Quote Key prefix, CodeWarrior interprets the next keypress as a keystroke, not as a command.
Returning to the earlier example, assume you assign the 1 key to a command. Assume also that you assign the tilde key (~) to be your Quote Key prefix. To execute the command, you would type the 1 key. To type a 1 into the editor, you would type the tilde key first, then the 1 key. (To type a tilde, you would press the tilde key twice.)
 WARNING!
The Quote Key only affects the next key or combination of keys that you type. You must use the Quote Key once for each bound key or combination of keys for which you want to type the equivalent character on-screen.
Assigning the Quote Key prefix
To assign the Quote Key prefix, follow these steps:
1. Click the hierarchical control next to the Miscellaneous item.
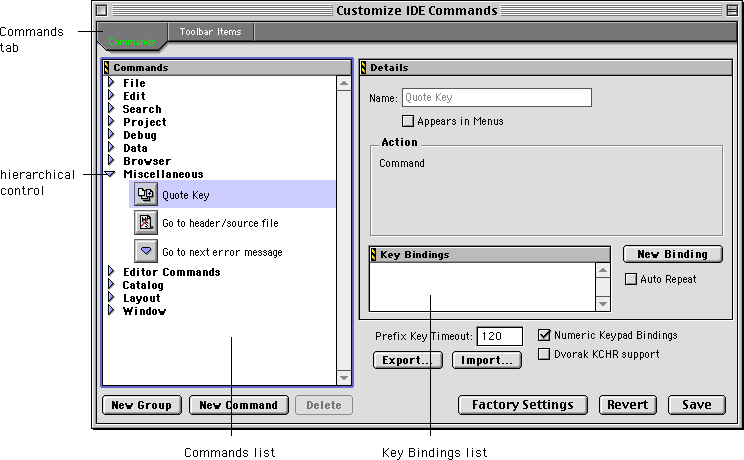
The Miscellaneous item, shown in Figure 8.34, is part of the Commands list in the Customize IDE Commands window.
2. Select the Quote Key item.
The Quote Key item is part of the Miscellaneous command group.
 NOTE
NOTE
If you want to use your keyboard's numeric keypad as part of the new key binding, enable the Numeric Keypad Bindings checkbox in the Customize IDE Commands window.
3. Click the New Binding button next to the Key Bindings list.
The Key Bindings list is shown in Figure 8.34. After clicking the New Binding button, the Edit Key Binding dialog box appears.
Figure 8.34 Customize IDE Commands - Quote Key prefix
4. Type the desired Quote Key prefix in the Edit Key Binding dialog box.
The keys you type are displayed in the dialog box. If you make a mistake or decide against what you have typed, click Cancel to return to the Customize IDE Commands window.
 NOTE
NOTE
(Mac OS) If you are using a Dvorak keyboard and you are experiencing problems with the Command key being recognized, enable the Dvorak KCHR Support checkbox in the Customize IDE Commands window.
5. Click OK in the Edit Key Binding dialog box.
The new Quote Key prefix appears in the Key Bindings list.
Setting the Prefix Key Timeout
The Prefix Key Timeout field sets the length of time that the IDE waits for the second key after you press a prefix key. The larger the value in this field, the longer the IDE waits for you to press the second key.
The timeout value is measured in "ticks," where each tick is 1/60th of a second (16.67 milliseconds). Legal values range from 1 to 999. The default value is 120 ticks.
Customizing Toolbars

A toolbar contains a series of elements, represented by icons, that act as buttons. Each element typically represents a corresponding menu command. When you click the element, the IDE executes the associated command. The toolbar can also contain elements that carry out actions other than menu commands. Figure 8.35 (Windows) and Figure 8.36 (Mac OS) show the toolbar in the CodeWarrior Project window.
 TIP
TIP
(Mac OS) To display balloon help that describes a toolbar icon, place the cursor over the toolbar element, then press and hold the Control key.
Figure 8.35 The Project window toolbar (Windows)

This section discusses toolbars in detail. The topics are:
Figure 8.36 The Project window toolbar (Mac OS, Solaris, and Linux)

Kinds of toolbars
There are two types of toolbars in CodeWarrior:
This distinction is important, because you can show, hide, clear, and reset the toolbar types using menu commands in the CodeWarrior IDE. These commands distinguish between the floating toolbar and the other window toolbars.
Your changes to one of these toolbar types apply to every instance of that toolbar type subsequently created. For example, if you modify the toolbar in an editor window, your changes appear in all editor windows opened thereafter. For more information, see "Modifying a toolbar" on page 310.
Each of the toolbars has a default configuration of elements that you can restore at any time. For more information, see "Restoring a toolbar to default settings" on page 312.
When you choose a menu command related to a window toolbar, the command affects the toolbar in the active window. For more information, see "Toolbar Submenu" on page 633.
Toolbar elements
A toolbar can contain the following types of elements.:
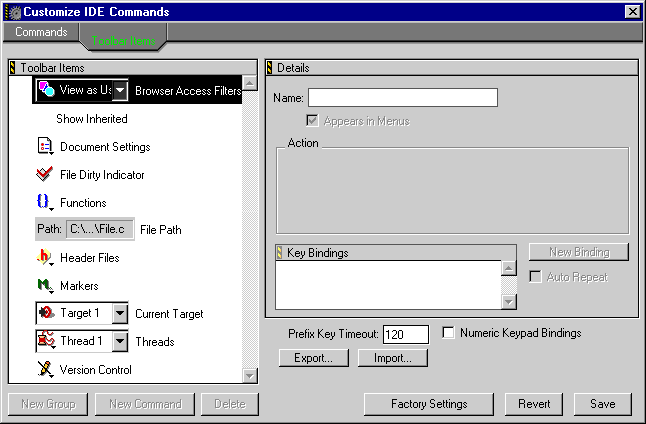
Click the Toolbar Items tab at the top of the Customize IDE Commands window to display the Toolbar view, shown in Figure 8.37. You use this view when adding new elements to a toolbar. For more information on adding elements to a toolbar, see "Adding a toolbar element" on page 311.
Showing and hiding a toolbar
Use the commands in the Toolbar Submenu to show or hide a toolbar. Hiding a toolbar does not change the toolbar's configuration of elements.
The following types of toolbars are discussed:
Main toolbar (Windows)
To display the main toolbar (sometimes called the floating toolbar), choose Window > Toolbar > Show Main Toolbar. To hide the main toolbar, choose Window > Toolbar > Hide Main Toolbar. For more information about restoring default toolbar settings, see "Restoring a toolbar to default settings" on page 312.
Floating toolbar (Mac OS, Solaris, and Linux)
To display the floating toolbar, choose Window > Toolbar > Show Floating Toolbar. To hide the floating toolbar, choose Window > Toolbar > Hide Floating Toolbar. For more information about restoring default toolbar settings, see "Restoring a toolbar to default settings" on page 312. For information about anchoring the floating toolbar, refer to "Anchoring the floating toolbar (Mac OS, Solaris, and Linux)" on page 313.
 NOTE
NOTE
(Mac OS, Solaris, and Linux) Hiding the floating toolbar does not change its anchored state. For example, if the floating toolbar is unanchored when hidden, it will remain unanchored when displayed again. For more information, see "Anchoring the floating toolbar (Mac OS, Solaris, and Linux)" on page 313.
Figure 8.37 Customize IDE Commands - Toolbars
Window toolbar
To hide an active window's toolbar, choose Window > Toolbar > Hide Window Toolbar. The other components of the window shift to fill the space previously occupied by the window's toolbar. All subsequently opened windows of that type will have hidden toolbars.
To display an active window's hidden toolbar, choose Window > Toolbar > Show Window Toolbar. The other components of the window shift to allow room for the window's toolbar. All subsequently opened windows of that type will display toolbars.
When you hide the editor window toolbar, the default tools appear along the bottom of the editor window, as shown in Figure 8.38. When you show the editor window toolbar, the tools reappear along the top of the editor window, as shown in Figure 5.1 on page 134.
You can also show or hide the editor window toolbar with the Toolbar Disclosure button. For more information, refer to "Seeing Window Controls" on page 142.
Figure 8.38 Editor window with hidden toolbar

Modifying a toolbar
You can modify a toolbar by:
In certain circumstances, there are restrictions on which elements you can add or remove from a toolbar. These limitations are fully explained in "Adding a toolbar element" on page 311 and "Removing a toolbar element" on page 311.
If you modify a toolbar, the changes apply to every instance of that toolbar subsequently created. For example, if you customize the Project window toolbar, those changes will affect every Project window you open, not just the toolbar in the active Project window. Windows that are already open are not affected.
Adding a toolbar element
You add an element to a toolbar by dragging and dropping it from the Toolbar Items list onto a toolbar. This list is part of the Toolbar Items view in the Customize IDE Commands window.
To add an element from the Toolbar Items list to a toolbar, follow these steps:
1. Select the element you want to add to a toolbar.
Make sure the destination toolbar is visible as well.
2. Drag the element from the Toolbar Items list to the destination toolbar.
If the destination toolbar accepts the element, framing corners appear in the toolbar. These framing corners show you where the new element will appear when you release the cursor. If the destination toolbar does not accept the element, framing corners do not appear.
3. Release the element at the desired position.
After release, the element is inserted in the destination toolbar at the point indicated by the framing corners.
There are several reasons why a toolbar does not accept an element:
Removing a toolbar element
You can remove toolbar elements to better suit your needs. To remove an element from a toolbar, Ctrl-right click (Windows) or Control-Command-click (Mac OS) on the element. Choose Remove Toolbar Item from the pop-up menu that appears. The element is then removed from the toolbar.
Removing all toolbar elements
You can clear all elements from a toolbar using commands in the Window menu. Clearing a toolbar is handy if you want to build your own toolbar from scratch.
Windows
To clear the main toolbar, choose Window > Toolbar > Clear Main Toolbar.
Mac OS, Solaris, and Linux
To clear the floating toolbar, choose Window > Toolbar > Clear Floating Toolbar.
To clear the toolbar from the current window, choose Window > Toolbar > Clear Window Toolbar.
In some cases, certain elements might not be removed by the Clear Window Toolbar command because they are critical to the window's basic purpose.
 NOTE
NOTE
If the floating toolbar is currently hidden, you cannot clear it. You must display the floating toolbar before clearing it. See "Showing and hiding a toolbar" on page 308 for more information.
Restoring a toolbar to default settings
You can reset a toolbar to its original (default) factory settings by using commands in the Window menu.
Windows
To reset the main toolbar, choose Window > Toolbar > Reset Main Toolbar.
Mac OS, Solaris, and Linux
To reset the floating toolbar, choose Window > Toolbar > Reset Floating Toolbar.
To reset a the toolbar in the current window, choose Window > Toolbar > Reset Window Toolbar.
 NOTE
NOTE
If the floating toolbar is currently hidden, you cannot reset it. You must display the floating toolbar before resetting it. See "Showing and hiding a toolbar" on page 308.
Anchoring the floating toolbar (Mac OS, Solaris, and Linux)
You can anchor the floating toolbar to the top-left corner of the screen, just below the menu bar. In its anchored state, the floating toolbar is joined to the IDE menu bar, cannot be closed with a mouse-click, and cannot be moved. Unanchored, the floating toolbar can be positioned anywhere on your screen.
To anchor the floating toolbar when it is currently free-floating, choose Window > Toolbar > Anchor Floating Toolbar.
To release the floating toolbar when it is currently anchored, choose Window > Toolbar > Unanchor Floating Toolbar.


Visit the Metrowerks website at: http://www.metrowerks.com
For assistance contact Metrowerks Technical Support at: support@metrowerks.com
Copyright © 1999, Metrowerks Corp. All rights reserved.
Last updated: May 24, 1999


 NOTE
NOTE

 TIP
TIP


 NOTE
NOTE


 NOTE
NOTE

 NOTE
NOTE


 TIP
TIP
 NOTE
NOTE
 WARNING!
 WARNING!


 TIP
TIP


 NOTE
NOTE


 NOTE
NOTE


 WARNING!

 NOTE
NOTE

 WARNING!


 TIP
TIP

 NOTE
NOTE
 NOTE
NOTE

 NOTE
NOTE
 NOTE
NOTE
 NOTE
NOTE
 TIP
TIP
 WARNING!
 NOTE
NOTE

 NOTE
NOTE
 TIP
TIP


 NOTE
NOTE


 NOTE
NOTE
 NOTE
NOTE


